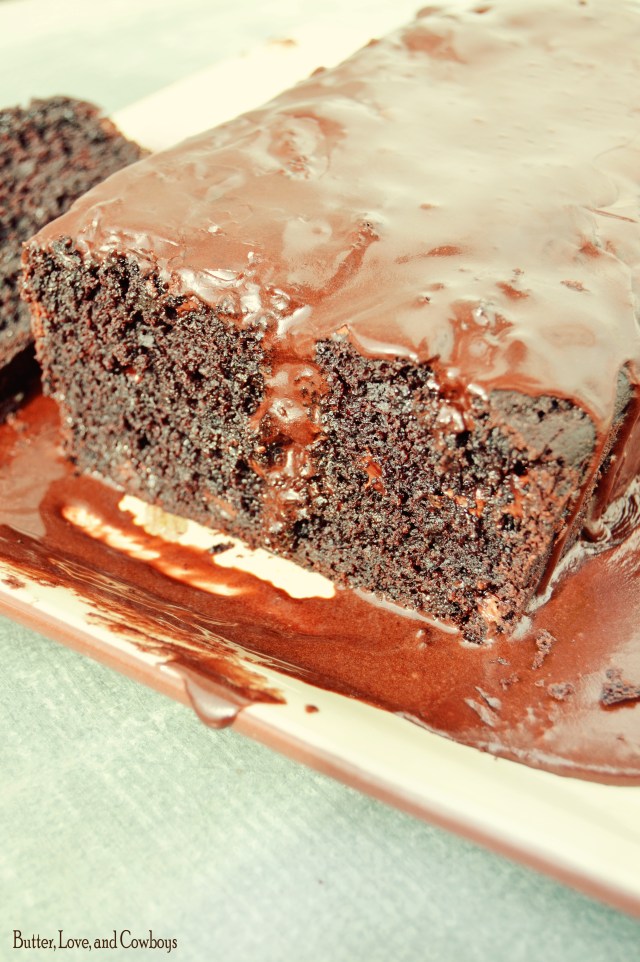
Samoa Bars are just like the famed Girl Scout cookie, but even better in my opinion. Their chocolate dipped shortbread crust, caramel-coconut layer, and chocolate drizzle, make them everything the original cookie is and more.
Samoa cookies are my favorite Girl Scout treat. I really like some of the others too, but Samoa’s have just always done the trick for me. Something I love about these Samoa Bars are they are substantially cheaper to make at home. A batch of Samoa Bars also goes much farther than a box of the cookies!
As is the story with many of my recipes, my older sissie Jessie introduced me to these bars. They have always been more of a spring/summer treat to me because the first time she made them for my family in Montana, she made them for the fourth of July. Therefore a warm weather treat they were and a warm weather treat they still are to me. I don’t know why I feel that way, but I just do, so there. Make them anytime of year though ;).
Don’t forget to subscribe and never miss a post!
Samoa Bars
2018-05-08 15:02:10
Serves 20
Samoa Bars are just like the famed Girl Scout cookie. Their chocolate dipped shortbread crust, caramel-coconut layer, and chocolate drizzle, make them everything the original cookie is and more
1. Preheat oven at 350 degrees F. Make the shortbread crust by creaming the butter and sugar. Add the vanilla and egg, then mix well. Gradually mix in the flour and the salt. Press crust into a greased 9x13 inch pan. Bake 20-25 minutes or until the edges are lightly browned and crust has set. Remove from oven and cool completely.
2. To make the topping, spread the coconut on a cookie sheet. Place in the oven bake at 350 degrees F for 10-15 minutes. Stir the coconut every five minutes until it is golden and toasted. Watch it carefully or the coconut could burn.
3. Place the caramels in a microwave safe bowl with the milk. Microwave on high in 1 minute intervals, stirring each time until caramels are completely melted. Combine the melted caramel and coconut. Spread the topping on the shortbread crust.
4. After the topping has cooled, cut into about 16-20 bars, depending how big you would like them. Melt the chocolate chips, with the shortening, in the microwave or on the stove. I usually do it in the microwave, at 60 percent, in 30 second intervals, stirring in between each interval, until the chocolate has melted. Dip the bottom of each bar into the chocolate and place the dipped bars upside down until chocolate hardens. Once the chocolate has hardened, flip the bars over and drizzle with more milk chocolate on top. Let chocolate set and store bars in an airtight container. Enjoy!
By Butter, Love, and Cowboys
Butter, Love, and Cowboys https://www.butterloveandcowboys.com/
Reese’s Peanut Butter Cup Frosting is a wonderful combination of chocolate, peanut butter, and Reese’s cups. Frosting just doesn’t get better than that. This Reese’s Frosting is made up of a buttercream base that is fantastic with brownies, cookies, cake, or even great for dipping graham crackers.
My personal favorite way to eat this Reese’s Peanut Butter Cup Frosting though is probably with a spoon. That’s all I need, but I try to temper my frosting intake with a brownie. You know, health goals.
I have been intending to create a chocolate and peanut butter frosting made with Reese’s peanut butter cups and I finally gone, done, and did it.
Bam.
It was positively wonderful. I actually made it to go on top of a banana cake. I thought it would be great- chocolate, peanut butter, and Reese’s with the banana flavor of the cake, because I think that combo is fantastic. As predicted, the Reese’s Peanut Butter Cup Frosting rocked, and was fabulous with the banana flavor, but the cake was too cake-y and a bit dry. I’m really not into cake-y cake. I prefer a super moist and dense one!
The banana cake was such a disappointment. I even went so far as to scrape the Reese’s Frosting off of a piece of the banana cake and place it on top of a week old brownie I had made the previous weekend. Fortunately, I have a rockin’ brownie recipe, so it wasn’t too bad even if it was a week old! I’m convinced anything sweet with this frosting will do the trick. That’s how much I love it.
PS. I really think you need to make a batch of brownies. Because Reese’s Peanut Butter Cup Frosting, that’s why. You can find my favorite brownie recipe here.
Frost away!
Reese's Peanut Butter Cup Frosting
2018-04-30 16:10:14
Reese's Peanut Butter Cup Frosting is a fantastic buttercream that combines just the right amounts of chocolate and peanut butter. Don't forget it is loaded with Reese's Peanut Butter Cups!
*1/4 cup cream or milk (may need more or less for consistency)
10 Reese's peanut butter cups, chopped
Instructions
Place the butter and peanut butter in a mixer. Beat until well combined. Add the vanilla and mix. Add the cocoa powder and mix until well combined. Add the powdered sugar, one cup at a time, mixing well between each addition. Add the cream or milk, until the frosting reaches a spreadable consistency. You may use more or less of the cream or milk than the recipe calls for.
Fold in the chopped Reese's. Spread over cooled brownies, cookies, cake, or dip graham crackers. Enjoy!
Notes
*I prefer to use cream, because it gives a richer flavor, but milk works just fine! Sometimes I use both, depending how much liquid the frosting needs.
By Butter, Love, and Cowboys
Butter, Love, and Cowboys https://www.butterloveandcowboys.com/
My Chocolate Chip Skookie is the perfect way to enjoy a warm, ooey, gooey chocolate chip cookie. The cookie base alone is great, but what really completes this rich dessert is the ice cream, homemade hot fudge, and any other toppings you want to load up on! My Hot Fudge Sauce is the bare minimum, but we almost always melt some peanut butter to load it up with too. Don’t forget about this Caramel Sauce, because it is also absolutely fabulous on a Skookie.
I imagine by now you have probably heard of a Skookie. They are pretty famous these days. Just in case you don’t understand their origins, let me break it down. Skillet+cookie=Skookie. This dessert is known by other names as well such as pizookie or just regular old skillet cookie. Around here it’s solely and affectionately called “Skookie”.
My Cowboy ranks this as one of his top two desserts. He says they are tied for first place with these Peanut Butter Brownies. They are definitely in the top five for me! Skookies and I have had a bit of a dangerous past. The first summer My Cowboy and I spent in wedded bliss, we ate Skookies. Lots and lots of Skookies.
Some good friends gave us two 6-inch Skookie pans as a wedding gift. So naturally, two people+two skookie pans=one skookie each. Right? Fifteen pounds later it didn’t feel quite so right to me anymore, so we put a stop to eating one Skookie each and started sharing instead. We have been sharing one ever since. Man have we matured in six years.
You wanna know one of my favorite things about Chocolate Chip Skookies? They are so easy. Just whip up some cookie dough and while it bakes, throw together some hot fudge. Not only do I love them for their simplicity, but they are also super versatile. Any flavor of cookie dough will do, but of course, I wanted to start off by sharing the original classic.
Chocolate Chip Skookie
2018-04-24 16:22:30
A Chocolate Chip Skookie is the perfect way to enjoy a warm, ooey gooey chocolate chip cookie, laden with ice cream and hot fudge. It is our favorite rich dessert!
Preheat oven at 325 degrees F. Cream butter and sugars until light and fluffy, about 2-3 minutes. Add vanilla and combine. Add egg and combine. In a separate bowl, combine 2 cups flour, baking soda, and salt. Gradually add to wet ingredients, mixing well between each addition. Add additional 1/4-1/2 cup flour, if needed. The dough should not stick to your hands. Mix in the chocolate chips.
Press a generous amount of cookie dough into a 5-6 inch cast iron skillet, until skillet is mostly full. Remember the dough will rise a little bit as it bakes. There should be enough cookie dough to make about four to five Skookies. Bake 18-22 minutes or until the edges begin to brown, but the center underneath is still slightly doughy. We like them best a little underdone. Once baked, remove Skookie from the oven and let cool about ten minutes. That way it is warm, but doesn't dissolve the ice cream too quickly!
Top with ice cream, hot fudge, melted peanut butter, and any other sauces you like! Place any leftover cookie dough in the refrigerator or roll into balls and place in the freezer to use for future Skookies or cookies.
Notes
*Please make yourself homemade hot fudge! It is so quick, easy, and tastes so much better. A link to my hot fudge sauce is in the first paragraph of the post!
By Butter, Love, and Cowboys
Butter, Love, and Cowboys https://www.butterloveandcowboys.com/
Chocolate Peanut Butter Eggs are a favorite Easter treat of ours! A delicious peanut butter truffle filling is coated in melted chocolate for seasonal perfection! Because they are simple and quick, you won’t have to spend the entire holiday baking. Instead, these will allow a little extra time with your loved ones. I like to make them a day ahead to make food preparation on Easter Sunday even easier.
Chocolate Peanut Butter Eggs have been an Easter tradition of ours since the beginning of our marriage. My Cowboy and I adore Reese’s Eggs. When I first saw the idea, everybody claimed they taste just like a Reese’s Egg. I hate to break it to ya, but they don’t. They are different, but in a good way. While these Chocolate Peanut Butter Eggs may not perfectly mimic the Hershey’s favorite, they are beyond worthy of their own spot on your Easter list. I make them each Easter and I use the same filling for peanut butter truffles at Christmas!
Peanut Butter. Oh ya.
Easter candy just happens to be my most favorite seasonal candy. Halloween candy is wonderful, Valentine’s candy is fun, and Christmas candy comes close, but- Easter candy. It makes me swoon. How does it get better than jelly beans, Reese’s white and milk chocolate eggs, Cadbury Creme/Caramel Eggs, or Cadbury Mini’s? Speaking of Cadbury Mini’s, don’t forget to try out these Easter macaroons made with Cadbury Mini’s I posted last year! And of course don’t forget to try these Chocolate Peanut Butter Eggs.
I have a question for you. Do you like Peeps or do you think they’re gross ? I don’t really like them much, but I tend to always have one or two each year- just because. Because they are cute, festive, and somehow eating something cute and festive can make up for not being very tasty.
While I believe that is true, I promise that Chocolate Peanut Butter Eggs are cute, festive, and tasty!
As much as I love peanut butter eggs and Easter candy, I am inexpressibly more grateful for the opportunity we have this holiday to celebrate Jesus Christ’s life and sacrifice for each one of us. May you all be blessed with the peace He offers. Happy Easter!
Chocolate Peanut Butter Eggs
2018-03-21 15:43:36
Chocolate Peanut Butter Eggs are filled with a peanut butter truffle filling and coated in melted chocolate. They are an Easter favorite!
1. Beat the peanut butter, powdered sugar, and melted butter until well combined. The dough will be crumbly. Add the milk and combine. Filling will still be crumbly.
2. Grab a few tablespoons of the peanut butter mixture and roll into the shape of an egg. Place on a cookie sheet and freeze about 15-20 minutes to harden.
3. While the peanut butter hardens, melt the chocolate with the shortening. I usually do it in the microwave, in thirty second intervals. I power down the microwave to sixty percent and stir in between each thirty second interval. You can use a double broiler to melt the chocolate as well. If you melt the chocolate in the microwave, use a microwave safe bowl.
4. Grab the peanut butter eggs from the freezer and dip them individually in the chocolate. I like to set them on a cookie sheet covered with parchment paper, or aluminum foil sprayed with cooking spray.
5. Allow the chocolate to harden. These keep best if they are refrigerated.
Notes
*You could dip some or all of the eggs in white chocolate as well!
*You can shape the eggs bigger or smaller if you want. I prefer less chocolate and more peanut butter so I make them big enough there is a lot of peanut butter filling. My mom prefers more chocolate so she likes them to be small. If you really want them to be chocolate-y, you can even double dip them in the melted chocolate!
Peanut Butter Chocolate Cheesecake- how does it get any better than that? Three heavenly foods all crammed into one dessert. I promise there is no exaggeration here as I declare this is definitely one of THE BEST cheesecakes I have ever tasted. It is so fudge-y and the layers upon layers of peanut butter and chocolate are perfection.
As I often say, together, chocolate and peanut butter create my most favorite combination. I thought this cheesecake looked ridiculously delectable, so when my sister asked what cake I wanted for my birthday in 2016, I requested this Peanut Butter Chocolate Cheesecake from the DIY Foodie. This recipe was so scrumptious it found it’s way onto my birthday list for 2017 as well. My birthday was in November, but you already know the whole story of how I got so behind on posting, so let’s just keep movin’ forward :).
You wanna know my favorite part about this cheesecake? My Cowboy made it from start to finish. Isn’t he just a rock star?
My Cowboy can totally cook and bake. It is so wonderful he can fend for himself when he needs to and can cook us tasty and nutritious meals when I am down and out. The only snag- he doesn’t always believe he can whip up the things I know he could do in a cinch.
Several years ago, we were doing a get together with my sister and her family. I had promised to make my Aunt JaNae’s famous cookie salad, but got sick to my stomach and had to leave it to My Cowboy. Or the time I had surgery and I was confined to the couch for a couple weeks- it took a little coaxing, but I talked him into homemade pizza with crust from scratch one Sunday afternoon. And you know what? The cookie salad and homemade pizza always turn out better when HE makes them!
It’s just not fair.
But I’ll still take it!
My sister and I always make each other’s birthday meal and cake- whatever the birthday girl requests. This past November was the first of six consecutive birthdays my sister wasn’t able to make it for my birthday to cook my dinner and bake my cake. Talk about sad. It’s so fun living by sisters! Being the absolutely wonderful husband he is, My Cowboy stepped up to the plate. He made me lasagna fit for a queen and Peanut Butter Chocolate Cheesecake. He knows the way to this girl’s heart. It also worked out that my Mom and Dad got to be there on my birthday- the first time that has happened since I was in high school!
Oh yes yes yes!
I also wanted to note that this Chocolate Peanut Butter Cheesecake may sound a little complicated or time consuming because of all the different layers, but I promise it is simple! And so worth your time and effort.
1. Preheat oven at 325 degrees F. Grease a 9-inch spring-form pan. Combine the crushed Oreo's and melted butter. Press into the spring-form pan. I like to go over the entire crust with the bottom of a cup to ensure it sets well. Unwrap the Reese's and place on top of the Oreo crust evenly.
2. In a mixer with the paddle attachment, mix cream cheese and sugar until smooth. Add eggs, vanilla, and sour cream, then mix until smooth. Take half of the batter from the mixing bowl and place in another large bowl. Add peanut butter to the bowl in the mixer, then melted chocolate to the other. Mix both until combined.
3. First pour the chocolate batter over top the Oreo crust and Reese's layer, then pour peanut butter batter over top the chocolate layer. Bake for one hour, then turn off the oven, keeping the oven door closed. Let it sit in the cooling oven for 1 1/2 hours.
4. To make the ganache topping, heat the cream in the microwave until almost boiling. Place the milk chocolate chips in a bowl and pour the cream over top. Whisk until well combined and spread evenly on top of the cheesecake after it has finished it's sitting time in the oven. Cool in the fridge for 4-6 hours.
Guess what? It’s the most wonderful time of the year! And Buckeye Brownie Cookies are the perfect addition to any Christmas cookie list. They are fudge-y, soft, peanut butter-y, and chocolate-y, so basically that means they are perfect.
These simple cookies remind me of my most favorite brownie-Peanut Butter Brownies. Buckeye Brownie Cookies are super similar to those, but in cookie form.
I’ve been on a little hiatus for a few weeks. I certainly didn’t intend for my little break to last this long, but we spent Thanksgiving across the country in Texas with my sister’s family, then we spent several days in Utah visiting more family. After that trip, I headed to Montana with my Mama while My Cowboy was away for a work trip. This week has been spent decking the hall’s at my parent’s and Christmas is well beyond full swing in our neck of the woods.
I am so excited for holiday baking and decided sharing these Buckeye Brownie Cookies was a good place to start the season here on Butter, Love, and Cowboys. Normally, I would have started my Christmas goodies sooner than this, but have had little time for baking with these many visits away from our house.
Oh that soft brownie bottom.
Oh that chocolate ganache topping.
Oh that peanut butter center.
Bless these Buckeye Brownie Cookies.
Buckeye Brownie Cookies
2017-12-07 16:26:39
A soft, fudge-y cookie stuffed with peanut butter and topped with smooth chocolate ganache.
1. Preheat oven at 350 degrees F. Beat brownie mix, cream cheese, and melted butter, and egg until just combined. Mix in the peanut butter chips and chocolate chips by hand. Shape the dough into one inch balls and place on a greased cookie sheet. Bake 10-12 minutes.
2. While the cookies are baking prepare the peanut butter filling. Beat the peanut butter and powdered sugar until combined. Form peanut butter filling in 1-2 teaspoon sized balls. Immediately after you remove the cookies from the oven, gently press a peanut butter ball into each cookie. Let cookies cool completely.
3. For the ganache, place the chocolate chips in a medium sized bowl. Microwave the cream until almost boiling. Pour over the chocolate chips and stir until melted completely. You may need to place it in the microwave for an additional 20-30 seconds to melt the chocolate completely. Spread about 1 tablespoon of ganache on top of each cookie. Enjoy!
Notes
*If you end up needing more ganache, just repeat the ganache recipe or make an additional half recipe until all the cookies have been covered. Leftover ganache also makes great hot fudge!
By Butter, Love, and Cowboys
Butter, Love, and Cowboys https://www.butterloveandcowboys.com/
The last recipe I posted was this phenomenal Harry Potter Butterbeer. When I posted that recipe, I wrote all about our annual Harry Potter party. Another treat I always whip up for our H.P. festivities are Cauldron Cakes. The first year we held our party, I searched high and low online for any spectacular ideas on how to create Cauldron Cakes. I found several, but none of them were quite what I was hoping for. So, I came up with my own version and naturally they became a combination of chocolate and peanut butter.
I’m not a huge cake fan. I make it for birthdays and that’s about it. Even then, it has to be a good homemade recipe. Brownies and their texture are more my style. Usually when I do any sort of cupcake, I make them out of brownie batter and decided that would be the way to go for these Cauldron Cakes. I usually use a boxed brownie mix and like to vamp it up with butter, buttermilk, and vanilla, but you could use your favorite homemade brownie recipe too. They are topped heavily with peanut butter buttercream, and the “cauldron” is filled with chocolate. Oh and don’t forget the Reese’s baked inside. That detail really has nothing to do with the theme of Cauldron Cakes, but the way I see it, why not put a Reese’s in the middle? 😀
Let’s talk Harry Potter. I love H.P. It was really a huge part of my childhood that helped make my formative years magical. Anytime a new H.P. book hit the shelves, had to be a good year. Almost just as exciting to me was the highly anticipated release of the next movie installment in the series. The final film was released the summer after I graduated high school. I went to see it in the theater with a group of my fellow H.P. loving friends a month or so before I left for college. That experience really made it seem like Harry Potter graduated with me as I said goodbye to childhood, adolescence, and headed towards adulthood. I cried as the movie ended and it wasn’t just because it was an emotional show with talented actors/actresses.
I have maintained a deep love of reading that developed at an early age. Books have the power to take us to places we never could have imagined going on our own. They introduce us to people we never would have met and can develop within us desires to understand and experience what lies beyond our own sphere. Harry Potter was one of the very first book series that created these opportunities for me. The first real exposure I had to Harry Potter came from my third grade teacher. She read many good books to my class throughout that school year, Harry Potter and the Sorcerer’s Stone being one of them. Over the next couple of years I read the remaining books in the series and continued reading until they had all been released.
Of the many things I hope to be able to instill in our future children, one of them is a love and appreciation for reading good books.
Like I said about the Butterbeer, you don’t have to be a H.P. fan to love these Cauldron Cakes and any H.P. inspired treats you may come across. I will mention however that they can definitely help you find your way into the truly magical world of Harry Potter!
Cauldron Cakes
2017-11-07 09:55:58
Yields 15
A brownie cupcake, stuffed with Reese's, topped with peanut butter buttercream, and filled with chocolate.
1 box brownie mix, or homemade brownie recipe (made for a 9x13 size pan)
2 eggs
1/3 cup buttermilk, or 1/4 cup milk (I prefer buttermilk, but either will work)
1/2 cup butter, melted
1 teaspoon vanilla
8 snack-size Reese's, cut in half
muffin cups, at least 15
Peanut Butter Buttercream
1/2 cup butter, softened
1 cup peanut butter
1 teaspoon vanilla
3-3 1/2 cups powdered sugar
Milk or cream (as needed, for consistency)
*Chocolate Ganache
1 1/2 cups milk chocolate chips
1/3-1/2 cup cream
Instructions
1. Preheat oven at 350 degrees F. Prepare the brownie batter by mixing the box brownie mix, eggs, buttermilk, melted butter, and vanilla. If using your own brownie recipe, prepare the batter. Place each muffin cup in a muffin tin. Fill the muffin cups 2/3 full with the brownie batter. Place a Reese's half in each cupcake and press down below the batter. Bake 18-25 minutes, or until a toothpick inserted comes out clean. Remove from muffin pan and let cool.
2. To prepare the frosting, beat the butter and peanut butter on medium-high speed until well combined. Add the vanilla and mix well. Next, add the powdered sugar, about 1 cup at a time, mixing until well combined between each addition. As you add the powdered sugar, gradually add the milk or cream, as needed for consistency. I probably add at least 1/4-1/3 cup of cream.
3. Fill a cup with a few inches of water to lightly dip the utensil you spread the frosting with. This will help to spread the frosting smoothly.To make the cauldron, spread a generous amount of the buttercream on top of each cupcake. We like a lot of frosting, but I know not everybody does. Use what you will be happy with as far as the frosting ratio goes, but it is easier to make the cauldron if you use a decent amount. As you spread the frosting, make a well in the middle of the cupcake, it will be about an inch wide and the depth depends how much frosting you use. I use enough the depth is probably close to 1/2 of an inch.
4. To prepare the ganache, place chocolate chips in a medium sized, microwavable bowl. Place the cream in a mug and microwave until almost boiling. Pour over the chocolate chips and whisk until there are no lumps. You may need to place the bowl in the microwave for 30-60 seconds. Let the ganache cool to room temperature. Place in the fridge or freezer to quicken cooling. Fill each well on top of each cupcake with the ganache. It is okay if it drips a little, it will be a little messier, but also makes the cauldron part even better 🙂
Notes
*For this batch of Cauldron Cakes I just made a chocolate ganache, but in the past I have also used my hot fudge recipe. You could use either. Some of my family members like the ganache better and some like the hot fudge filling better. Personally, I can't quite decide! The ganache is a little stronger on the chocolate flavor, while the hot fudge is a little more on the sweet side.
Butter, Love, and Cowboys https://www.butterloveandcowboys.com/
Pumpkin Brookies are another great compliment to fall. A pumpkin bar bottom with a fudge-y brownie on top equals delicious. Oh and don’t let me forget to mention the chocolate glaze! My Cowboy and I both agreed that the chocolate glaze really made the bars, so don’t go skimping the bars by leaving them without it :).
I sure love pumpkin everything when it comes to dessert, but I have really grown to love chocolate and pumpkin together the last few years. So it was no surprise to me that these two main layers that make up Pumpkin Brookies were the perfect combination.
Like I already said, don’t go thinking they don’t need glaze :D. It really completed them. And for once in my life, I didn’t drench them with topping, I actually did a fairly thin covering-fairly being the key word. Seriously though, this was holding back for me. These Pumpkin Brookies proved to me they didn’t need much glaze, but they did need a little dab.
1/3 cup buttermilk or milk (regular milk will work, but I prefer buttermilk)
2 eggs
1 teaspoon vanilla
1 cup chocolate chips
For the Chocolate Glaze
3 cups powdered sugar
1/4 cup cocoa powder
2 tablespoons butter, melted
1/2 cup cream (again milk totally works, but you won't need as much, but a glaze made with cream is much more flavorful. It may take more or less liquid, depending on how thick you like your glaze. I always eyeball this.)
Instructions
Preheat the oven at 350 degrees F. Grease a 9x13 pan.
For the Pumpkin Layer
Place melted butter, pumpkin puree, and sugars in a large bowl. Mix with a wooden spoon or spatula until combined. Add vanilla and mix well. Add egg and mix well. In a separate medium sized bowl, combine the flour, baking soda, salt, and pumpkin pie spice. Gradually add to pumpkin mixture. Fold in chocolate chips. Press into your greased 9x13 pan.
For the Brownie Layer
In a large bowl, place brownie mix, melted butter, buttermilk or milk, eggs, and vanilla. Mix until well combined. Fold in chocolate chips. Pour on top of the pumpkin base. Bake 30-40 minutes or until a toothpick inserted in the center comes out clean.
For the Chocolate Glaze
Whisk together the powdered sugar, cocoa powder, melted butter, and cream. Whisk until very well combined and smooth. Pour over top of Pumpkin Brookies and enjoy! These would even be great served with ice cream!
Notes
*Of course any homemade brownie recipe works too, but this is a super simple way to vamp up a brownie mix!
In the future, I may try the brownie layer on the bottom and pre-bake it a while before adding the pumpkin layer on top, because the brownie layer took longer to cook through than the pumpkin layer did.
Butter, Love, and Cowboys https://www.butterloveandcowboys.com/
Happy first day of fall! I can’t think of a better way to celebrate than with this Chocolate Pumpkin Bread. For ages, I have had pumpkin bread combined with chocolate on my mind, and I finally got it made. It is my first official pumpkin recipe of the season, and for that I am excited.
I love fall. The one consolation to me when summer comes to an end is that it means fall is here. I am definitely a four-seasons-kind-of-gal, but I really look forward to summer all year long and it is such a bummer to me when it is over.
Fall definitely helps ease the pain.
You know what else helped ease the pain? This Chocolate Pumpkin Bread. Pumpkin bread really is fantastic enough by itself, but this version takes it to infinity and beyond. The actual bread has all the ingredients you would normally see in pumpkin bread, but with a whole bunch of cocoa added to seal the deal. Plus chocolate chips- I don’t believe in any pumpkin bread without chocolate chips.
The bread ends with a chocolate glaze. When I made the glaze, I was doubling the recipe for two loaves and really thought I was making plenty. I was wrong. Therefore, I will fill the recipe card with instructions for a batch of glaze that will go a little farther. I would never want to con you into thinking that my recipe gives you ample glaze, and have you disappointed that you needed to hurry and make up another batch.
When it comes to glaze, I like a decent covering, like shown in the pictures, but I also like to have enough to set aside that we can put on top of our individual pieces after they are cut.
Another thing about quick breads is that they are, well, quick! It only takes a few minutes to throw them together for the oven. Plus Chocolate Pumpkin Bread will make your house smell dreamy. Happy Fall!
Preheat oven @ 350 F. In a large mixing bowl, combine vegetable oil, eggs, sour cream, sugar, vanilla, and pumpkin. In another bowl, combine, flour, cocoa powder, pumpkin pie spice, baking soda, and baking powder. Pour wet ingredients in with the dry ingredients and mix until combined. Fold in the chocolate chips. Place in a greased 9x5 loaf pan and bake for 40-45 minutes or until toothpick inserted in the center comes out clean. Let cool ten minutes then flip onto a serving plate.
To make the chocolate glaze, whisk together melted butter, powdered sugar, cocoa powder, cream, and vanilla. I find it hard to give an exact amount of liquid for a glaze, because it is dependent on who thick you want it. I prefer a thicker glaze, so add as much or as little cream as you like, until the desired consistency is reached. Pour over the pumpkin loaf and enjoy! Store leftovers in an airtight container.
Butter, Love, and Cowboys https://www.butterloveandcowboys.com/
Oh boy is this recipe a doozy! Caramel Chip Bars are about as tasty as it gets. This is another recipe from my sister Jessie. So many of both My Cowboy’s and I’s favorite recipes come from her. She is just a whiz in the kitchen. This is a brownie-like bar that is one of my main picks when it comes to making a dessert to take and share.
Caramel Chip Bars are as easy as they are delicious and come together in a cinch. The brownie part of this dessert comes from a simple cake mix, oil, eggs, AND plenty of chocolate chips! The caramel layer is semi-homemade, but tastes so great. Honestly it’s a filling I use in a lot of different recipes now. If I am too short on time to do a homemade sauce, I will even serve it as caramel sauce for ice cream or dip for fruit.
This is a side shot, and it’s really not the prettiest, but I really wanted you to get a better glimpse of all that caramel!
Go on and give ’em a whirl 🙂
Caramel Chip Bars
2017-09-12 16:01:55
An ooey-gooey brownie bar bursting with chocolate chips and oozing with caramel
1. Preheat oven at 320 F. Mix the cake mix, oil, and eggs until combined. Add milk chocolate chips, white chocolate chips, and optional toffee bits. Combine by hand. Press half of the dough into a greased 9x13 pan. Bake for twelve minutes. Cool for ten minutes before adding caramel.
2. While the first cake layer is baking and cooling, unwrap the caramels and place in a medium size saucepan with the sweetened condensed milk and butter. Melt over medium-low heat until well-combined, stirring occasionally. Once the mixture is mostly melted, I like to whisk it long enough to ensure there are no chunks.
3. Pour caramel over the first cake layer. Top with remaining cake batter by sprinkling it over the caramel in teaspoon-fulls Bake an additional 20-25 minutes. These bars are great warm or cold, but I usually let them cool an hour or two.
Notes
If you're looking for a less chocolate-y option, use a yellow cake mix. I really, really, REALLY love them as is though 🙂
Butter, Love, and Cowboys https://www.butterloveandcowboys.com/